
Personal Safety Alarm App: What It Does and How to Choose
You’re leaving the library, finishing a late shift, or waiting for a rideshare. Your phone’s in your hand, and you’d like someone to know where you are without having to text your location at every turn. A safety app sounds useful, but the important question isn’t just how you trigger an alert. It’s who receives it, what they can see, and what happens if your connection drops.
A personal safety alarm app can add a connection to trusted people and trained monitoring staff. It still needs preparation: permissions, available battery, a workable connection, and contacts who understand their role.
Table of Contents
- What a Personal Safety Alarm App Does
- How an Alert Reaches Help and What Happens Without Signal
- Setting Up and Running the App on Every Trip
- Privacy and Do Not Disturb Settings That Matter
- Where the App Helps Most on Late Walks, Rideshares and Campuses
- Lone Work, Families and Team Deployments Compared
- Choose the Plan That Matches Your Risk
What a Personal Safety Alarm App Does
A personal safety alarm app turns your phone into a connected emergency tool that can share information with people who can help. Unlike a standalone siren, a monitored app can transmit live video, audio, and location rather than relying only on someone nearby hearing a noise.
Not every safety app offers the same service. Our app supports selected contacts watching a trip, trained Safety Agents responding to SOS, and emergency escalation to 911 through RapidSOS. Those are different functions, so starting a shared trip shouldn’t be confused with requesting emergency help.
People use these tools in different ways. An individual might share a walk home, a student might arrange a campus check-in, and a family might coordinate arrival messages. An employer might provide access for staff traveling between sites or working alone.
Core features and what each one does
| Feature | What It Does | When It Helps Most |
|---|---|---|
| One-tap SOS | Sends your stream, location and audio to a trained Safety Agent | Something feels wrong and you cannot explain it aloud |
| Go Live streaming | Shares live video, audio and route with selected contacts | Walking home or riding in a rideshare |
| Nudges | Sends one-tap prompts such as You good? or Home yet? | Checking in without typing while moving |
| Recording and transcription | Saves the stream and creates a transcript and AI summary | Documenting an incident afterward |
| Movement detection | Prompts you during the hours you set | Working alone or walking at night |
| Ghost mode | Takes you temporarily off the map | Pausing location sharing for privacy |
| Emergency Entry Pin | Guides responders to the closest entrance | Finding a building entrance quickly |
The Emergency Entry Pin is a location aid, not a privacy setting. A street address might identify a building, while the pin identifies an entrance someone can use. That distinction matters when the main doors are locked or the accessible entrance faces another street.
Monitoring and documentation serve different purposes
Live monitoring helps another person understand what’s happening now. Recordings, transcripts, and summaries help you review what happened afterward, but an automated transcript shouldn’t be treated as a verified account of every spoken detail.
Start with the response route: Know where SOS goes and who’s on your emergency contact list before exploring extra features.
The app supplements emergency services. It doesn’t replace calling 911 when you can safely make that call, and installing it alone doesn’t establish a complete safety arrangement.
How an Alert Reaches Help and What Happens Without Signal
An alert needs a receiver, not just an activation screen. A vibration or animation may tell you that you pressed SOS, but it doesn’t necessarily establish that another person has received your information.
With our SOS service, one tap shares your livestream, audio, and location with a trained safety dispatcher and starts text communication. Starting Go Live instead shares the trip with your selected watchers, with a Safety Agent available when you need help.
The process below illustrates the intended flow. Reconnection and continued updates still require a usable connection.
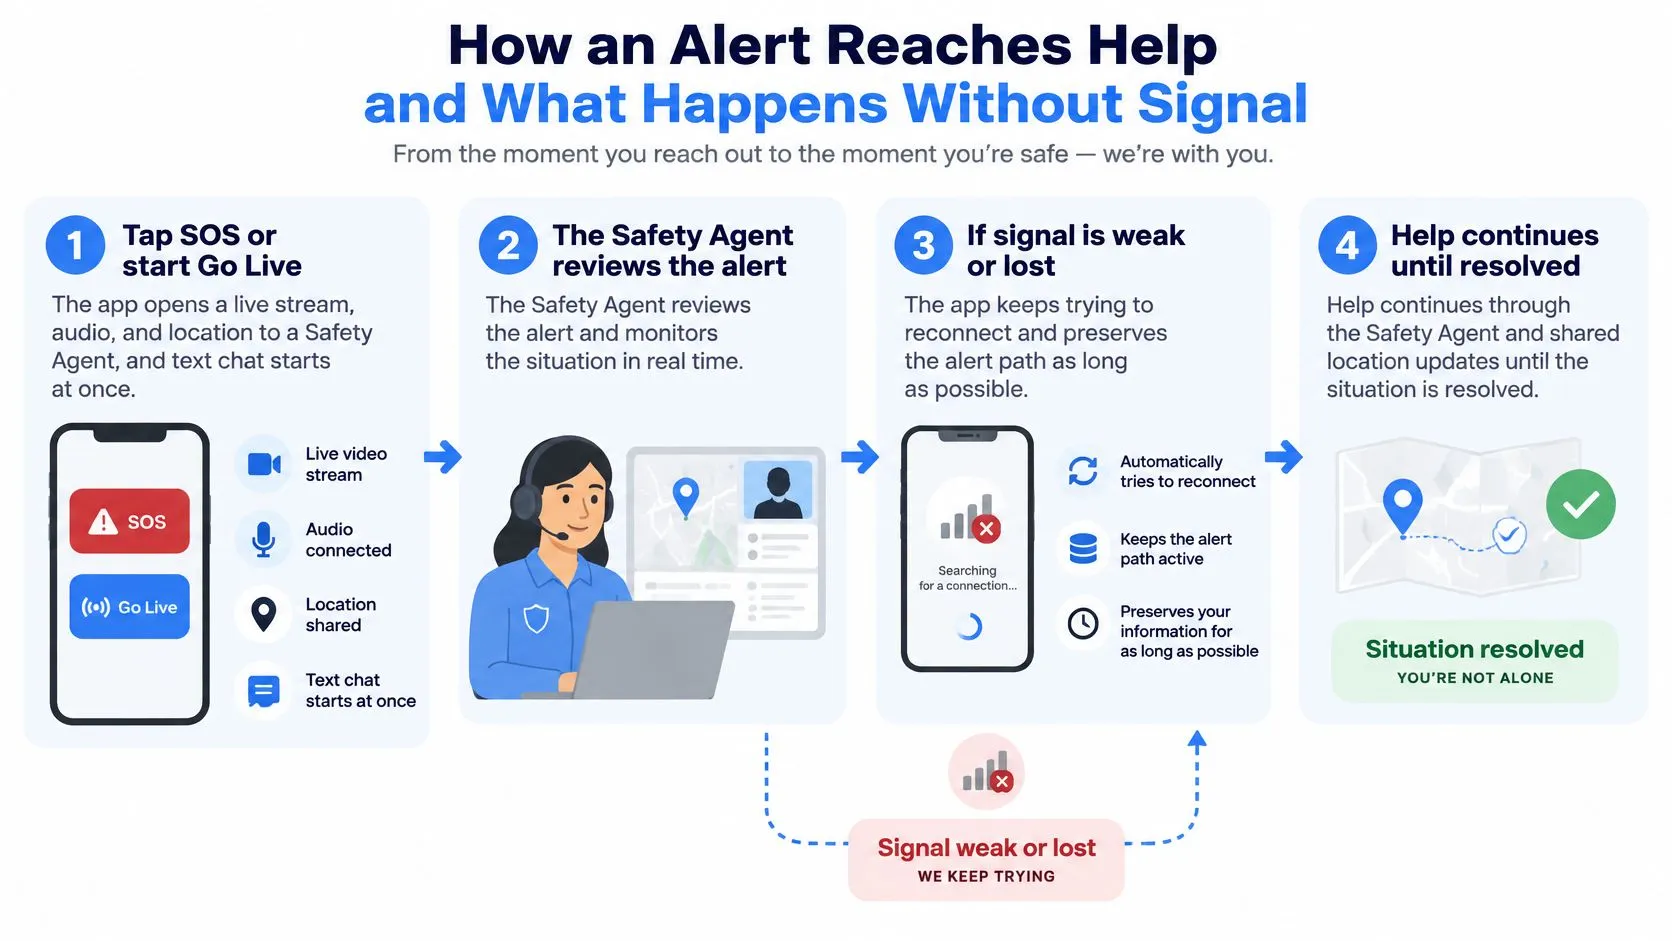
From activation to emergency escalation
When you connect to a Safety Agent, the agent watches your stream and location during the text conversation. You can describe a concern without saying it aloud, and the agent can use the available information to assess what assistance is needed.
Pressing SOS, or an emergency contact triggering it on your behalf, sends your stream and location straight to 911 through a Safety Agent. Our emergency response app overview explains this supported response route. Escalation uses RapidSOS, but transmitting information isn’t the same thing as guaranteeing a particular emergency response or arrival time.
From a locked phone, a live SOS can start with as few as two taps. That shortcut is useful only if you’ve configured it and can operate it on your own device.
Alert routes and who receives them
| Route | Who Responds | What Responders Receive | Best Used When |
|---|---|---|---|
| Go Live to squad | Your selected contacts | Live route and video in one view | You want watchers for the whole trip |
| SOS to Safety Agent | Trained Safety Agent, who can escalate to 911 | Stream, location and text chat | Something feels wrong |
| Emergency for a Friend | Safety Agent and the 911 center covering your friend’s location | Friend’s location and a group text | A friend cannot raise the alarm |
| Direct 911 call from phone | 911 dispatcher | Voice call and available phone location | Immediate danger and you can speak |
Emergency for a Friend opens a group text with your friend and the Safety Agent. Emergency alarms are routed to the 911 center covering the friend’s location, rather than assuming the caller and friend are in the same place.
What changes when connectivity fails
A 2025 ACM paper on emergency applications notes that many depend on internet connectivity and identifies limited research on systems that continue through SMS or other offline channels. Don’t assume that GPS availability means your alert can leave the phone: locating yourself and transmitting that location are separate operations.
Underground transit, weak coverage, crowded venues, and congested networks can interrupt uploads. A receiver might have only your last known location and its timestamp, not a current stream.
- Check delivery status: Look for evidence of receipt or acknowledgment, not just an indication that you activated SOS.
- Confirm fallback behavior: Establish whether SMS, voice, or queued delivery is supported before relying on it. Don’t assume these are included.
- Try a direct emergency call: A cellular voice call may work when mobile data doesn’t, though it also requires an available connection.
A disconnected stream isn’t a live view. Treat the last received image and location as historical information until updates resume.
Use an agreed test procedure to confirm that a real person receives your test alert. Don’t trigger a live emergency dispatch merely to see whether the button works.
Setting Up and Running the App on Every Trip
A useful setup ends with something you can demonstrate: your chosen contact can watch, your activation shortcut works, and everyone knows when you expect to arrive. Downloading the app is only the beginning.
Prepare while you’re somewhere calm, with your phone charged and your contacts available. Use a designated test workflow or arrange testing with support so practice doesn’t cause an unnecessary emergency response.
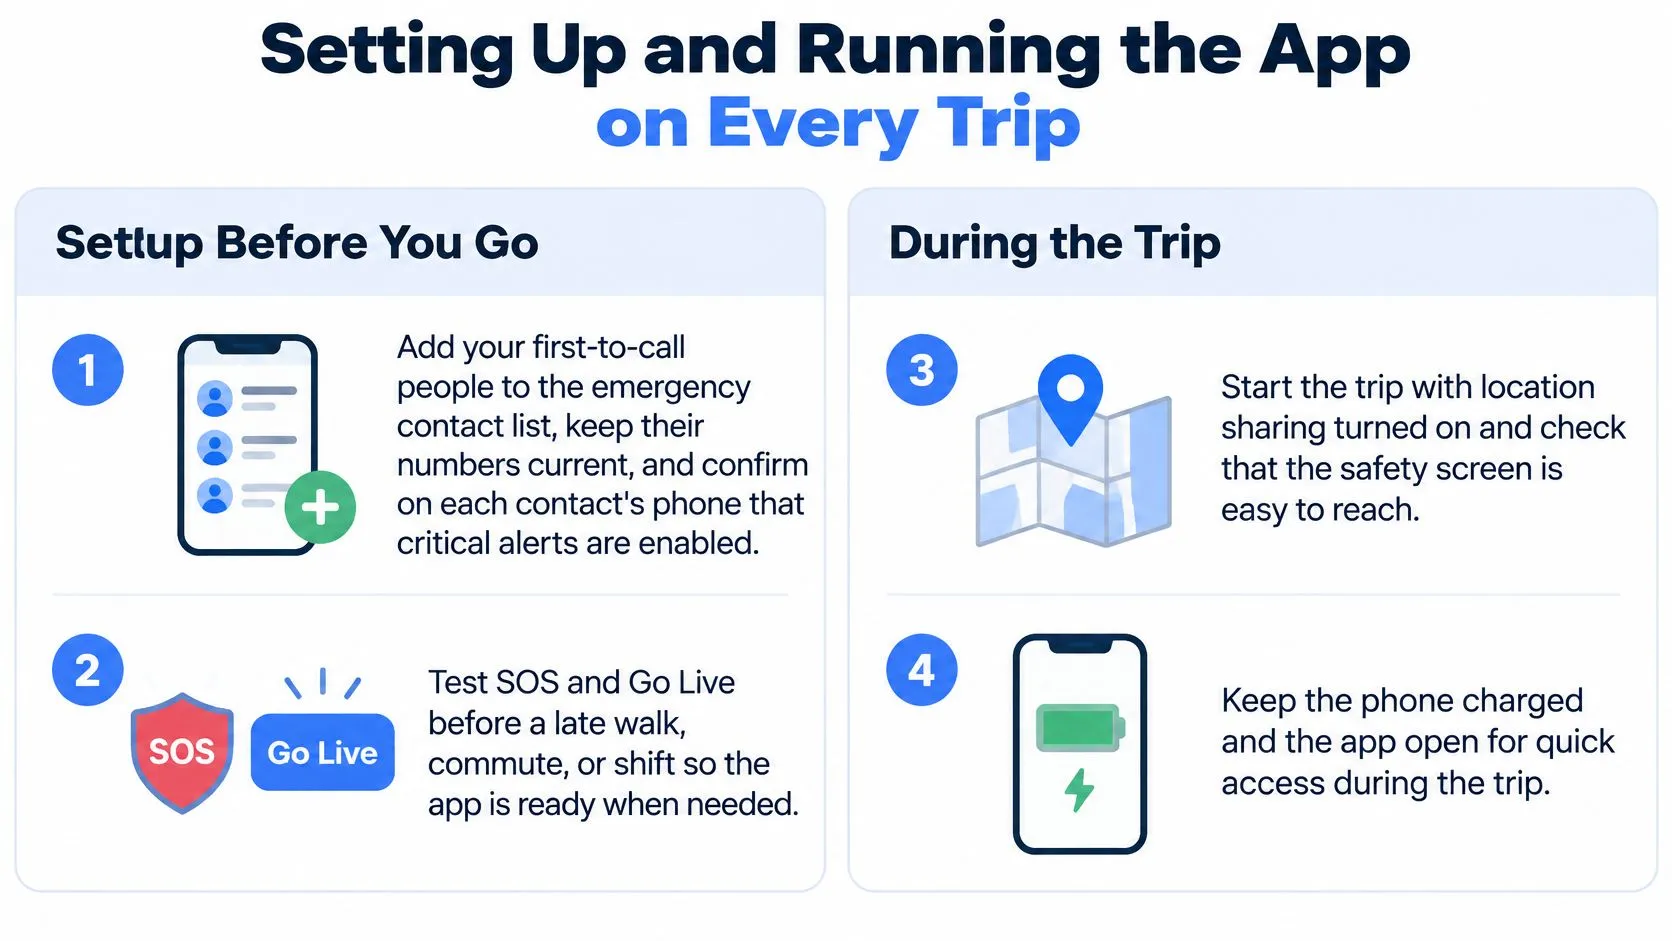
Configure the people and shortcuts
-
Add your first-to-call people. Enter current numbers and tell each person what being an emergency contact involves. Our emergency contact list and in-case-of-emergency resources help you keep that information written down and current.
-
Choose which squad members can watch your Go Live route and video. Have a selected member open a practice session on their own phone, because sending an invitation doesn’t prove they can view your trip.
-
Set up Lock Screen widgets for Go Live and SOS. Rehearse finding the correct control while the phone is locked, using the approved test procedure. Learn which shortcut shares a trip and which requests assistance.
-
On each emergency contact’s phone, review notification permissions together. The recipient’s settings matter as much as yours, so don’t treat your own successful setup as confirmation that theirs is complete.
Make your location useful
-
Enable precise location and review the entrance pin. For familiar buildings, place the Emergency Entry Pin at the useful entrance and add floor or access instructions where supported. An address alone may leave a responder facing the wrong side of a large building.
-
Set movement-detection hours around the times you want prompts. Try the nudge replies while stationary first, so you recognize the controls before using them on a walk.
-
Practise with your usual grip and accessibility tools. Try reaching the controls with the phone where you normally carry it, including in a pocket or bag with the screen off. If a shortcut doesn’t work reliably for your hands, vision, or mobility, establish another supported activation route.
The FCC dispatchable-location requirements document describes U.S. wireless E911 requirements that include dispatchable location or horizontal accuracy within 50 meters for 80% of covered calls. That’s a public-safety benchmark, not a guarantee that an app’s map dot identifies your exact doorway.
Useful incident context includes a timestamp, accuracy radius, floor information when available, and an entrance. Indoors, check whether your position is current or uncertain, and keep location updates enabled during an active incident rather than assuming the initial fix remains accurate.
Run the trip deliberately
Before leaving, check battery level, sharing status, and the expected check-in time. Keep the phone accessible, and avoid settings that prevent the app from performing the functions you’ve chosen.
Our Safety Agent is a trained person who joins your livestream and texts with you, so you don’t have to announce a concern aloud. Your squad can watch the whole trip, with agent support available when needed.
A finished setup means a tested squad, a usable locked-phone route, and an agreed check-in time. Location remains supporting context, not a substitute for speaking directly with emergency services when you can.
Privacy and Do Not Disturb Settings That Matter
An emergency notification that gets attention is also a privacy trade-off. Your contact may hear it at work, during sleep, or in a public place, and the notification can reveal your location on their device.
Our SOS-connected emergency contacts receive a critical alert that overrides silent mode and Do Not Disturb, sounds like an amber alert, and shows your location. That’s deliberately different from an ordinary message someone can easily miss.
However, siren notifications reach only emergency contacts who are also app friends and have Critical Alerts allowed. A name in your contact list alone isn’t enough.
Set expectations before enabling loud alerts
Tell each contact what an alert means and what you want them to do. They should understand whether to open the app, reply, communicate with the Safety Agent, or call emergency services when they have immediate information about danger.
Our guide to alarms on silent mode can support that settings conversation. Review the permissions on the receiving phone rather than assuming Do Not Disturb will be bypassed automatically.
Privacy check: Choose emergency contacts who can handle both your location information and the responsibility of receiving an urgent alert.
Keep viewing and recording under your control
Ghost mode temporarily takes you off the map. It can provide a welcome pause from location sharing, but check its state before a journey when you intend someone to follow your progress.
Watchers see your stream only while you’re live. A watcher who wants to join the audio uses Request to speak, which requires your approval, so viewing doesn’t automatically give them permission to speak into your session.
Recorded streams, transcripts, and AI summaries create another privacy consideration. Before recording other people, check the recording and consent rules that apply where you are, and establish who can access saved material and how long it remains available.
- Critical Alerts: Confirm the recipient has allowed them.
- App friends: Check that emergency contacts have the required connection.
- Ghost mode: Make sure its state matches your current sharing preference.
- Watcher approval: Understand how to accept or decline audio participation.
Don’t share account credentials as a substitute for inviting a watcher. Give people the access they need through the app’s supported controls, and review that access when relationships or responsibilities change.
Where the App Helps Most on Late Walks, Rideshares and Campuses
A student leaves the library after dark, a passenger rides home, or someone crosses an unfamiliar campus. In each case, a watcher needs more than a dot on a map: they need to know the intended destination and what to do if the person stops responding.
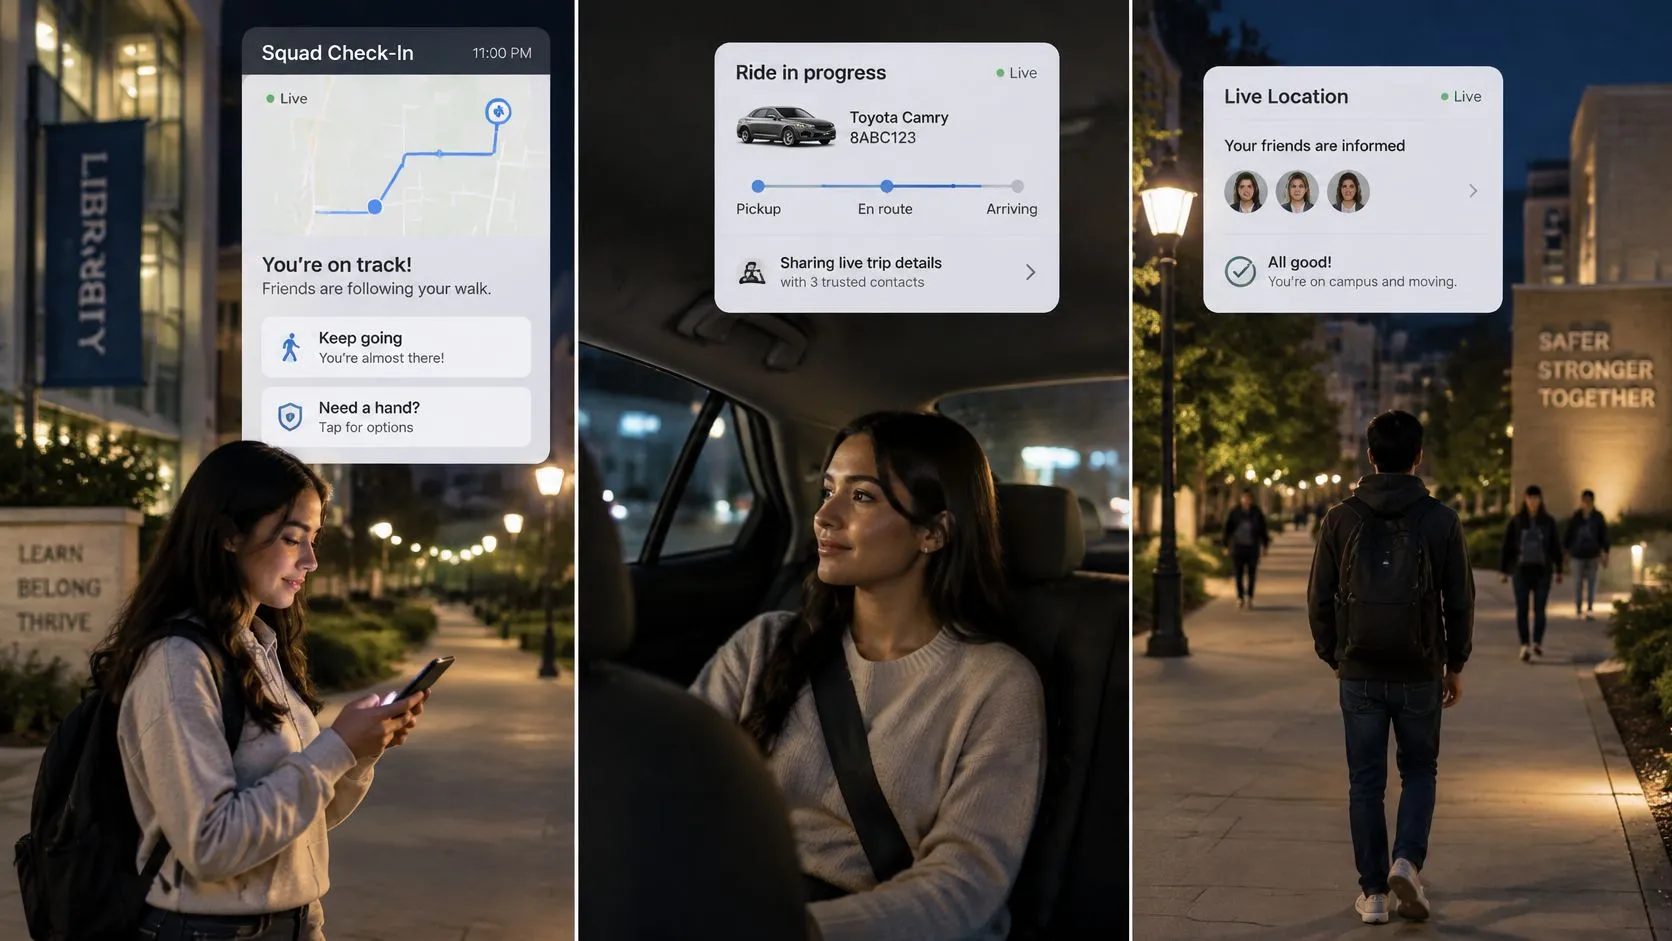
A student leaving the library
Before setting off, the student can go live and ask a housemate to confirm they can see the route and video. A nudge during the walk gives the student a quick way to check in without composing a message.
Agree on what should happen if a check-in goes unanswered. A planned stop may be routine; silence past an agreed time may call for the watcher to contact the student or take another agreed step. The destination and expected arrival time give the watcher useful context.
A passenger heading home
Before getting into a rideshare, compare the vehicle and driver details with the booking. The passenger can share the trip so a trusted watcher can follow the route and video, rather than relying on repeated messages for updates.
From January 2021 through December 2022, 99.9998% of 1.8 billion U.S. Uber trips ended without a critical safety incident covered by Uber’s safety report, according to Uber as summarized by The State News in 2024. The figure covers incidents in that report. It does not guarantee the outcome of an individual ride or show that a safety app prevents harm.
A watcher can follow the trip and communicate with the passenger. If the route changes unexpectedly, they should check in rather than urge the passenger to confront the driver.
Crossing a campus or visiting somewhere unfamiliar
On a campus with several entrances, naming the intended entrance gives a watcher a more precise destination than the building name alone. 3rd-i’s school safety features include emergency communication, closest-entry pinning, and indoor mapping, shaped by its partnership with Make Our Schools Safe.
For other unfamiliar destinations, read practical guidance such as Japan safety for solo female travellers and set a clear communication plan. Before leaving, tell a willing watcher where you’re going, when you expect to finish, and what missed check-in should prompt action.
Lone Work, Families and Team Deployments Compared
A staff member finishing a site visit may need a direct route to a Safety Agent. A family coordinating arrivals may need each person to manage their own access. The right setup depends on who is covered, who can administer the group, and what happens when someone sends an SOS.
Individual, family and organization setups
| Setup | Who Is Covered | What Each Member Gets | Who Manages It |
|---|---|---|---|
| Individual | You alone | Personal SOS and the option to go live | You, on your own plan |
| Family | Household members | The ability to go live and let their squad watch the trip | Family members |
| Organization | Staff, students or group members | A direct connection to a Safety Agent, with live video, shared location and SOS for lone work | Administrators with access to the Security Center panel |
With 3rd-i’s lone worker safety app, a team member working alone can connect directly to a Safety Agent. Institutional and enterprise customers, including employers, schools and universities, can enroll users in an Organization group and designate administrators with access to a dedicated Security Center panel.
Choose management access deliberately
An individual setup leaves management with the user. Family members can go live and let their squad watch the trip. In an organization, administrators manage group access through the Security Center panel.
Before enrolling staff, plan the deployment around the work itself:
- Work patterns: Identify roles that involve working alone, traveling between sites or covering different locations.
- Administrator access: Decide who needs access to the Security Center panel and who needs only personal safety functions.
- Seats and minutes: Estimate how many people need access, then project likely streaming time from their work routines. Build in room for longer jobs or delays.
- Incident handling: Set a procedure for who responds to an alert and how the organization handles access to live video.
An app does not replace safe staffing, hazard controls or a clear emergency procedure. Staff should know how to request help and what information their organization’s administrators can access.
Choose the Plan That Matches Your Risk
A late walk that runs longer than expected uses more streaming time than a short trip. Choose a plan based on the sessions you expect to run, with some room for delays. Safety Agent monitoring and 911 escalation are included on every individual plan, so compare the tiers by price and minutes rather than assuming emergency support is reserved for a higher tier.
Solo Basic and Solo Pro also include emergency contact triggering and emergency entry guidance. Family plans pool minutes, so the allowance is shared rather than separate for each member.
Individual plans, prices and minutes
| Plan | Monthly Price | Minutes Per Month | Safety Agent Monitoring |
|---|---|---|---|
| Solo Basic | $9.99 | 300 | Included |
| Solo Plus | Not specified | Not specified | Included |
| Solo Pro | $29.99 | 1,500 | Included |
| Family Basic | Not specified | Not specified | Included |
| Family Plus | Not specified | Not specified | Included |
| Family Pro | Not specified | Not specified | Included |
The available plan details list prices and minute allowances for Solo Basic and Solo Pro. For the other tiers, check the current plan terms before choosing; don’t estimate their prices or allowances from neighboring tiers. For a Family plan, add up the sessions each member expects to share, since everyone draws from the pooled minutes.
Estimate the sessions you actually intend to share
List the trips you’d likely stream: an evening walk after class, a ride home after a shift, or travel between work sites. Estimate the duration and frequency of each, then add time for occasional longer trips or waits if you plan to keep the session live.
Compare that monthly estimate with the plan’s listed minutes. Leave room for a trip that takes longer than expected, so you’re not tempted to end a session early to conserve time.
Buying rule: Choose the lowest-cost plan with enough minutes for the sessions you expect to run.
Before buying, check how the plan handles using more than its allowance. Don’t assume that extra use is included or that pooled minutes give each family member a separate allocation.
Finish by choosing your squad and agreeing on a test trip. Have a watcher confirm that the route and video are visible, then check that your expected use fits the allowance. Set up your emergency contacts and other safety settings before relying on the app.
3rd-i offers live video, audio, and location sharing, Safety Agent support, and emergency escalation for personal journeys, families, and lone-working teams. Visit 3rd-i to compare available plans and set up your squad before your next late walk or commute.