
Lone Worker Safety Devices: Types and How to Choose
A field technician is finishing a visit alone, a hotel employee is checking a quiet floor, or a nurse is about to enter a client’s home. If something goes wrong, the safety question isn’t whether they have a device. It’s whether an alert can get through, someone can understand what’s happening, and help can reach the worker if the first connection fails.
Lone worker safety devices can start that response, but they can’t replace a complete plan. The right choice depends on the hazards, the work location, the worker’s ability to use the device, and the steps people will take after an alarm.
Table of Contents
- Types of Lone Worker Safety Devices Compared
- Tracing an Alarm and Its Fallback Layers
- Criteria for Choosing a Device Your Team Can Trust
- Questions to Ask a Monitoring Provider
- Privacy, Consent and Recording Rules to Set First
- Build Your Lone Worker Safety Plan This Week
Types of Lone Worker Safety Devices Compared
The exact number of U.S. employees who work alone isn’t known because major occupational-health systems don’t consistently record whether someone was alone when an incident occurred. The 2024 NIOSH bulletin on lone workers cites an estimate of 53 million lone workers across the United States, Canada, and Europe, approximately 15% of the overall workforce. Treat that as a cross-regional benchmark, not a precise census.
| Device type | How it raises an alarm | Strongest for | Main limit |
|---|---|---|---|
| Personal panic button | The worker presses a button or pendant to send an SOS. | A fast, one-action alarm when the worker can act. | Useless if the worker can’t press it. |
| Man-down or fall detection | Sensors detect a fall or lack of movement, then alert after a set timeout. | Incapacitation when the worker can’t call for help. | A dropped or loosely worn device can trigger a false alarm. |
| GPS tracker | Sends the worker’s location on request, at intervals, or when an alarm starts. | Finding someone across a large or moving site. | Location alone doesn’t show whether the worker is injured or threatened. |
| Scheduled check-in | The worker confirms they’re safe at set intervals; a missed check-in triggers escalation. | A simple routine for workers who don’t need dedicated hardware. | Relies on the worker remembering and on an interval suited to the task. |
| Smartphone safety app with live video and audio | The worker shares video, audio, and location with selected contacts or a monitoring team. | Showing responders what’s happening, not just where the worker is. | Needs signal, battery, and the necessary app permissions. |
| Hazard or gas sensor | Detects a specified hazard, such as gas or heat, and raises an alarm. | Workplaces with hazards a person may not see or smell. | Detects site hazards, not an assault or medical event. |
A team rarely needs to choose just one type. A wearable SOS device combined with check-ins, for example, can provide both an immediate way to call for help and a way to notice when a worker stops responding. A personal SOS push button may suit a worker who needs a quick alert, while a sensor can add a layer for situations where the worker might be unable to press anything.
The form of the device matters, too. A pendant that catches on protective equipment or a phone app that workers can’t operate with gloves may look capable on paper but prove awkward during a real shift. For a useful overview of how organizations approach lone-worker protection, ABCO Security Services’ guide to lone-worker safety offers another point of comparison.
Start with the risk: sudden incapacitation, a long isolated walk, an invisible hazard, or movement across a large site. Then choose the device that addresses that risk. The most feature-packed option isn’t automatically the most useful.
Tracing an Alarm and Its Fallback Layers
An alarm is the start of a chain, not the end of one. The worker triggers a device, a signal travels to a monitoring centre or designated contact, a person assesses the alert, and that person passes useful details to whoever can respond. If any link fails, the plan needs another way to notice the problem or reach help.
From button press to useful information
Consider a worker at a remote site who falls and can’t stand. An SOS and a location pin may show where the worker is, but they won’t explain that a leg is trapped or that the nearest entrance is blocked. A live voice conversation can reveal the injury, hazards, access limits, and whether the worker can move without making matters worse.
The University of Idaho’s lone-worker guidance recommends reliable, effectively instantaneous communication and a method for quickly establishing verbal contact during an emergency. It also advises having a backup method, such as a radio, when a system relies on one channel. Check-in frequency should reflect the task and its environment, so a missed response doesn’t go unnoticed for too long.
A practical alarm chain looks like this:
- The worker triggers an alarm. That may be a button press, a fall alert, or a missed check-in.
- The signal travels. It may use a cellular connection or another available channel.
- A monitoring team receives and assesses it. The alert should reach a person who can verify what’s happening and act on the details.
- Someone tries to speak with the worker. Two-way communication can help establish the situation and the urgency.
- The right people are contacted. A supervisor, local contact, or emergency service needs the information required to locate and assist the worker.
Practical rule: A map pin can help responders find a worker. It can’t tell them what they’ll face when they arrive.
Decide what happens when a link fails
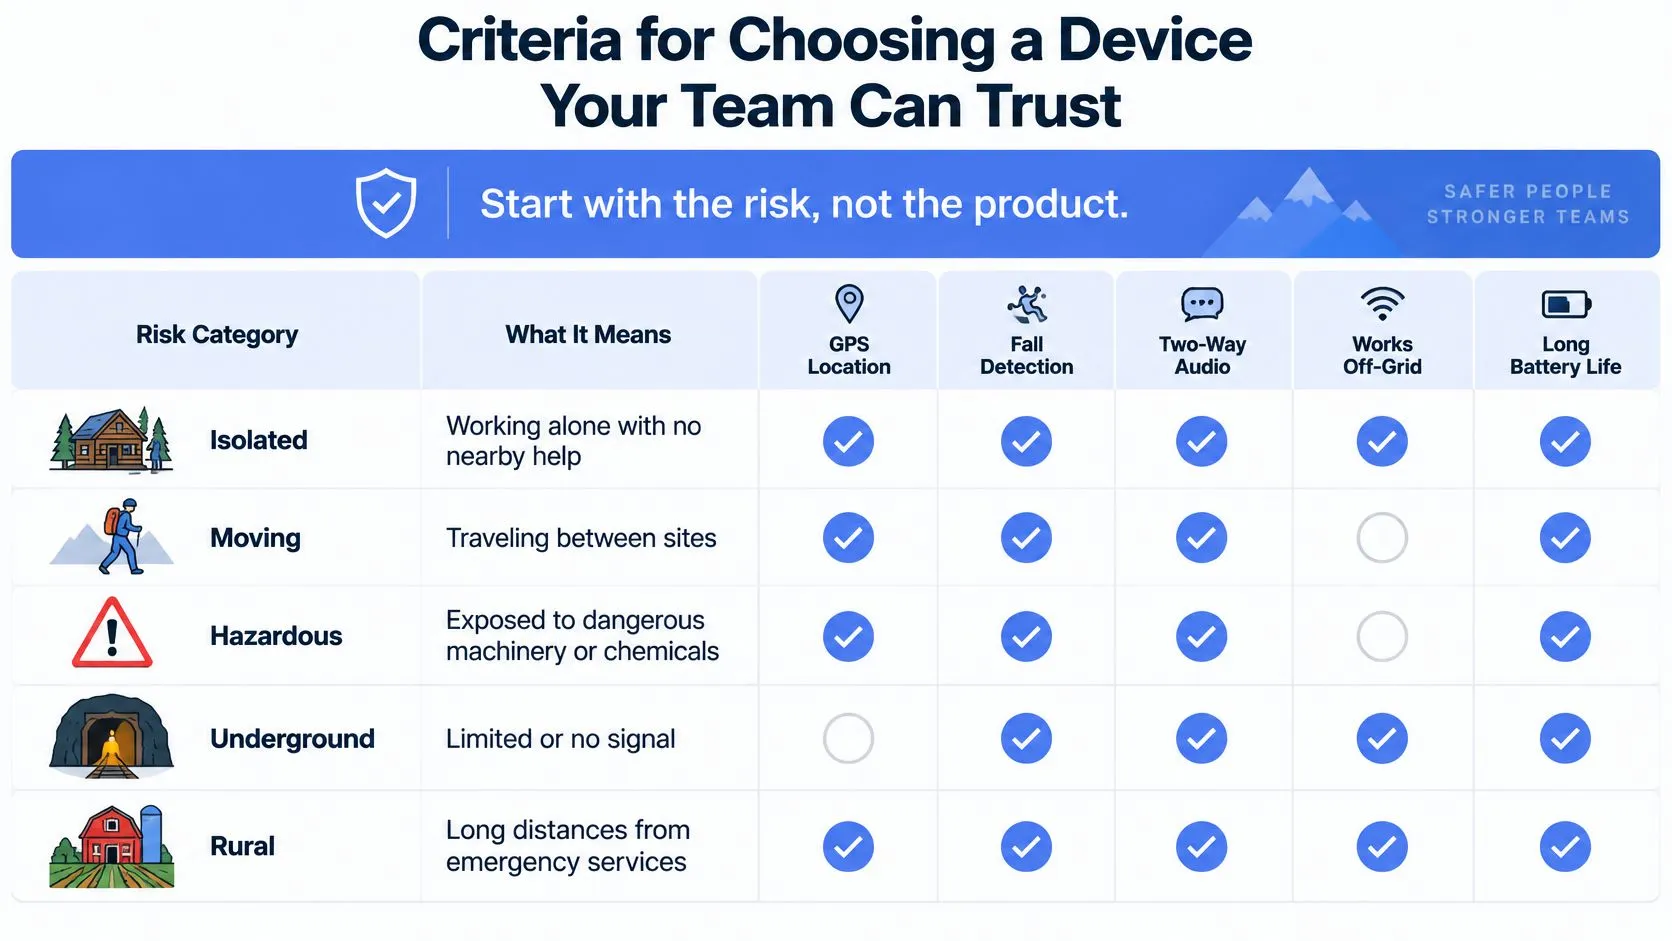
Cellular dead zones, underground locations, roaming, depleted batteries, disabled app permissions, noisy work environments, and missed alerts can all interrupt the chain. A GPS feature or SOS button doesn’t remove those risks. Location-based features are supplemental tools and shouldn’t be relied on alone in an emergency or safety situation.
A fallback sequence should name who acts and what happens next:
- A check-in is missed. The system records the missed response and starts the agreed escalation process.
- The monitoring team calls the worker. If there’s no answer, they don’t treat silence as proof that everything is fine.
- The supervisor is contacted. The supervisor checks the worker’s schedule, last known location, and any relevant site details.
- Local emergency contacts are reached. These may know the location, access route, or conditions on site.
- Emergency services are dispatched when needed. They receive the worker’s last known location and practical access information.
OSHA’s emergency-preparedness guidance recommends emergency communication systems and tools for contacting law enforcement, fire services, and others. That doesn’t make any single channel sufficient: employers still need to decide what workers should do when a call, app alert, or check-in doesn’t get through. A guide to SOS-only phone connectivity can help explain what a phone’s SOS-only status means, but it isn’t a substitute for testing workplace coverage.
A useful drill tests the entire chain, including the person who must answer and make the next call. The embedded video can add context on lone-worker alarms, but a video or device demonstration can’t confirm that the signal will reach a particular site.
Criteria for Choosing a Device Your Team Can Trust
Begin with the work, not a product catalogue. List each task, where it happens, and the worst realistic outcome if a worker is alone. A home visit, a warehouse shift, and a trip between rural sites create different demands, even if all three workers carry phones.
Match capabilities to the risk
The Texas Department of Insurance guidance on lone-worker safety identifies GPS, man-down detection, panic buttons, and hazard sensors as relevant capabilities. It says automatic alarms should transmit without delay and emphasizes direct two-way communication with a supervisor or monitoring staff.
Use that as a starting point, then test how the chosen device behaves in the actual work setting. For a worker who may fall while alone, test automatic detection and the route for confirming an alarm. For a worker moving between sites, check location performance and communication coverage along the route. A team exposed to gas needs a sensor suited to that hazard, not a more elaborate location feature.
Measure how the system performs
Record the same practical measures during a pilot so you can compare options on performance, not just feature lists.
| Measure | What to record | Why it matters |
|---|---|---|
| Alert delivery time | Seconds from trigger to receipt at the monitoring centre. | Shows whether alarms transmit without delay. |
| Location accuracy | Distance error indoors and at the actual site. | Shows whether responders can find the worker. |
| Detection and false-alarm rate | Missed events and false triggers each month. | Helps prevent staff from ignoring alarms. |
| Battery endurance | Operating hours across a full shift and in cold conditions. | Checks for silent failure near the end of a shift. |
| Human contact time | Time from alarm receipt to live voice contact. | Confirms that a person actually responds. |
Include drills indoors, underground, in rural locations, and in areas with weak signals. Write down the point at which the monitoring team contacts a supervisor or emergency services, and review false alarms and missed events regularly. Device uptime alone isn’t enough if workers don’t carry the device, an alert doesn’t reach anyone, or a responder can’t act on its information.
The Texas Department of Insurance document also reflects an important limitation: NIOSH describes the evidence evaluating lone-worker controls as limited, with unresolved questions about effectiveness in remote and rural areas, maintenance costs, worker adoption, and the volume of generated data. That’s a reason to test your use case rather than assume a device will work as advertised.
Make the cost comparable
Ask vendors to show the annual cost per worker in a consistent format. Include hardware purchase or rental, any per-worker subscription, monitoring fees, and battery replacement. If a device is shared, document how many workers use it and how you’ve allocated its costs. NIOSH identifies maintenance cost as an unresolved question, so include upkeep rather than comparing only the initial purchase price.
A subscription or app alone doesn’t establish compliance with workplace safety rules. Treat the device as one part of a documented risk assessment, with written procedures for check-ins, escalation, training, and fallback communication.
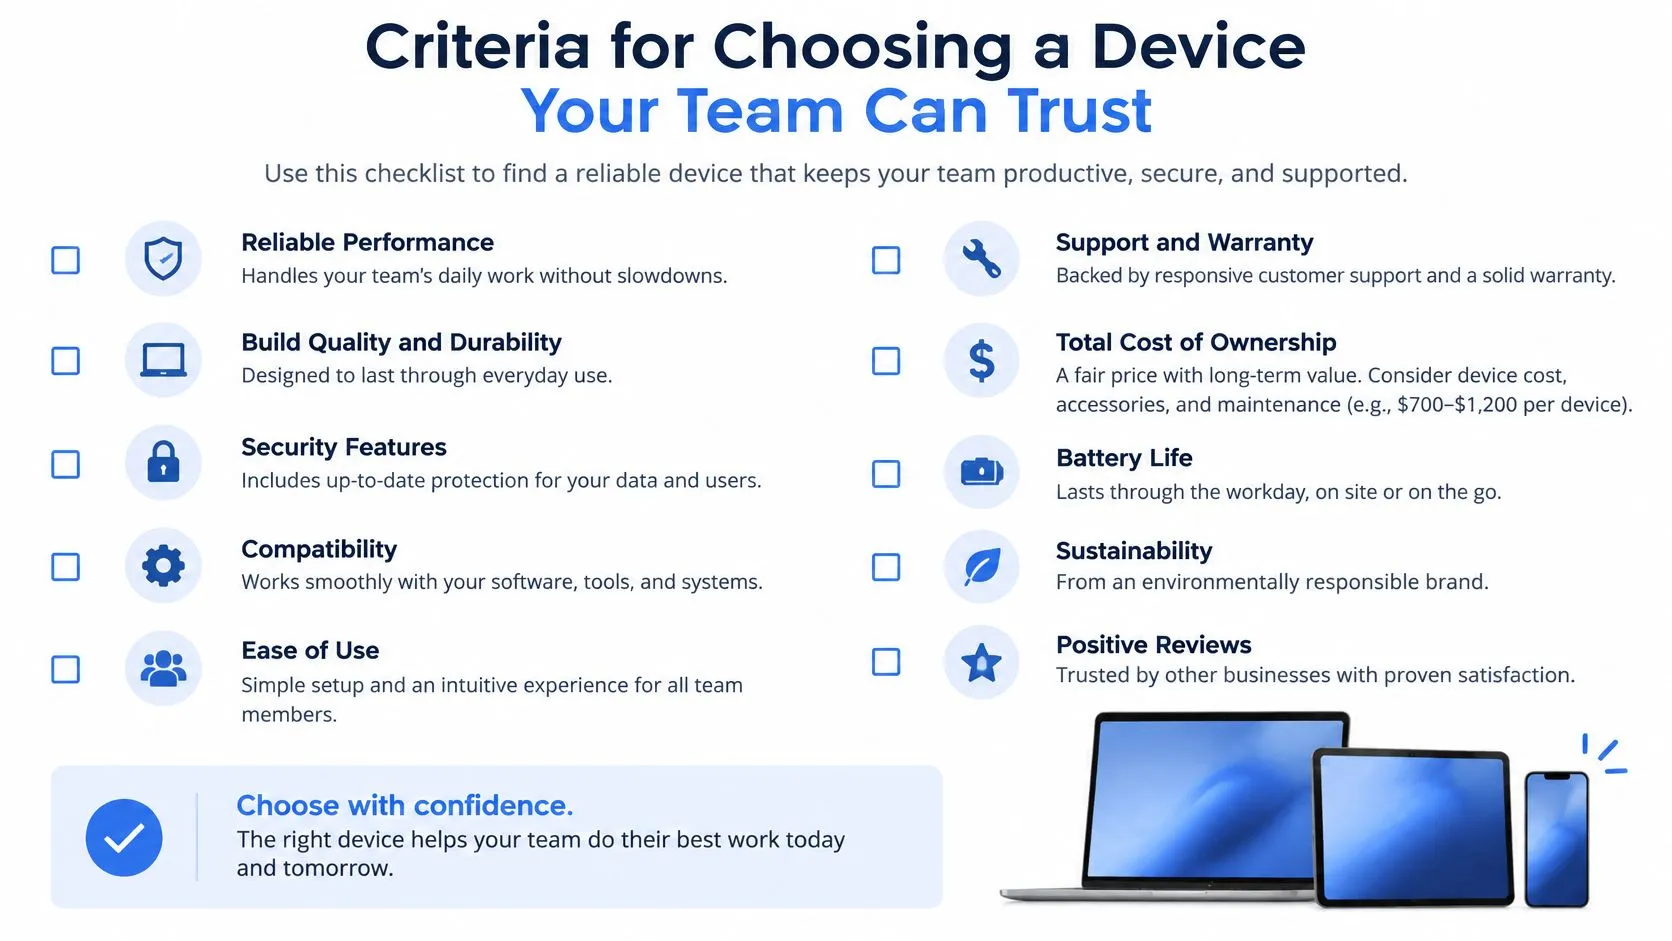
Before you shortlist a supplier, copy this checklist into your procurement file:
- Risk fit: Which tasks and hazards does the device address?
- Site test: Has it been tested in the actual work locations?
- Alarm performance: What were delivery time, location accuracy, false alarms, and human contact time in the pilot?
- Battery and coverage: What happens at low charge or when the usual network is unavailable?
- Response procedure: Who receives the alert, and who is contacted if the worker doesn’t answer?
- Full cost: What is the annual cost per worker, including equipment, service, monitoring, and batteries?
- Privacy and records: Who can access the data, and how is it managed?
Questions to Ask a Monitoring Provider
A monitoring provider is part of the response system, not just the company that supplies an app or device. The British Standards Institution’s information on BS 8484 says the standard was first published in 2009 as a code of practice for lone-worker device services. BSI identifies BS 8484:2022 as the current release, following revisions in 2011, 2016, and 2022.
BS 8484 defines a lone worker as someone working without close or direct supervision, including at home, away from a company base, or outside normal hours. Its scope covers more than hardware: it includes monitoring, training, management information, response options, and procedures. Use the standard as a benchmark for questions, not as proof that a particular service will work in your circumstances.
Send these questions to every shortlisted provider in writing:
- How do you verify an alert before sending responders? Ask what staff do when they can’t reach the worker.
- What is your measured false-alarm rate? Ask how often you report it and how you identify missed events.
- Who speaks with the worker, and how quickly? Ask how the service records the time from alarm receipt to live contact.
- Where are the coverage gaps? Include your actual sites, underground areas, and roaming situations.
- Which BS 8484 version do your procedures map to? Ask which operational practices the service follows.
- What is the full annual cost per worker? Include hardware, subscriptions, monitoring fees, and batteries.
- Who can access location and audio, and how long is data retained? Ask for the access and retention rules in writing.
Compare the answers against your work tasks and pilot results, not against a sales demonstration. A provider that can explain its verification process and escalation steps should be able to describe them clearly before you sign.
Privacy, Consent and Recording Rules to Set First
More monitoring isn’t automatically safer. If workers believe a safety tool is really a way to watch their productivity, they may distrust it or leave it unused. Continuous observation can also collect information about bystanders, homes, clients, or sensitive work areas that has nothing to do with raising an alarm.
Before deployment, answer the questions workers are likely to ask: Who can see their location or hear audio? When does monitoring begin? How long are recordings kept? Can a worker pause tracking during a break? What happens if a device captures a client, student, or member of the public?
Set limits before collecting data
Choose controls that fit the reason for monitoring:
- Collect only what’s needed. Gather information that supports a safety response, not a continuous record of every activity.
- Limit access by role. Give location and audio access only to people who need it for safety duties.
- Explain consent and use. Tell workers when monitoring begins, what is captured, and how an alert is handled.
- Set a retention limit. Decide how long recordings and location records are kept, and when they’re deleted.
- Keep an audit log. Record who accessed sensitive information and when.
- Provide privacy controls. Where appropriate, let workers pause routine tracking during breaks while preserving a clear emergency process.
- Handle incident recordings consistently. Identify who can review them and how they’re retained after an incident.
Separate safety monitoring from productivity monitoring in both policy and practice. A manager can review alarm logs, drill results, and response times without watching workers continuously. If a school uses automated alerts, limiting those alerts to safety data is one example of collecting information for a defined purpose, but the policy still needs to be checked against local rules.
Privacy expectations and applicable law can differ across campuses, home visits, rideshares, and cross-border work. Write the policy for the places and roles involved, and check it locally before turning on recording or location sharing. A clear employee safety monitoring approach should explain who can view data, why access is needed, and how workers can use privacy controls.
Trust is a safety factor. If a worker hesitates to activate an SOS because they expect punishment or unnecessary scrutiny, the tool may not be used when it matters. Make the purpose narrow, explain it plainly, and collect no more than the response process needs.
Build Your Lone Worker Safety Plan This Week
Start with the site map. Every later choice depends on knowing where staff work alone, which routes they travel, and where a call or alert may fail.
- Map sites and routes. Mark isolated work areas and known coverage gaps, including underground spaces and routes between locations.
- Match tasks to risks. List each task, its setting, and the worst realistic outcome. Choose candidate device types for those risks.
- Set privacy rules. Write the worker notice, access limits, and retention rule before monitoring begins. A lone-worker policy framework can help organize those decisions.
- Run a pilot. Use drills to record alert delivery time, location accuracy, false alarms, battery endurance, and time to human contact.
- Choose the device mix and provider. Compare the results with written answers about coverage, escalation, monitoring, and total annual cost.
For teams considering 3rd-i, our lone-worker coverage is designed for retail and late shifts, hotels and hospitality, and field teams and home visits. Safety Agent monitoring and 911 escalation are included on every individual plan, while RapidSOS SOS and dispatch features are currently available only in the United States and may not be available in every area or at every time. Check the coverage, monitoring, and dispatch availability for your specific locations before committing.
No device replaces a fallback plan. Your next action is to draw the site map, mark where workers are alone, and use it to decide what the alarm chain needs to cover.
3rd-i provides a personal safety app with live video, audio, and location sharing, plus Safety Agent monitoring for lone-working situations. Visit 3rd-i for teams to see whether its app and monitoring approach fit your team’s work locations and response plan.